|
||||||||||||||||||||||||||||||||||||||||||||||
|
|
|
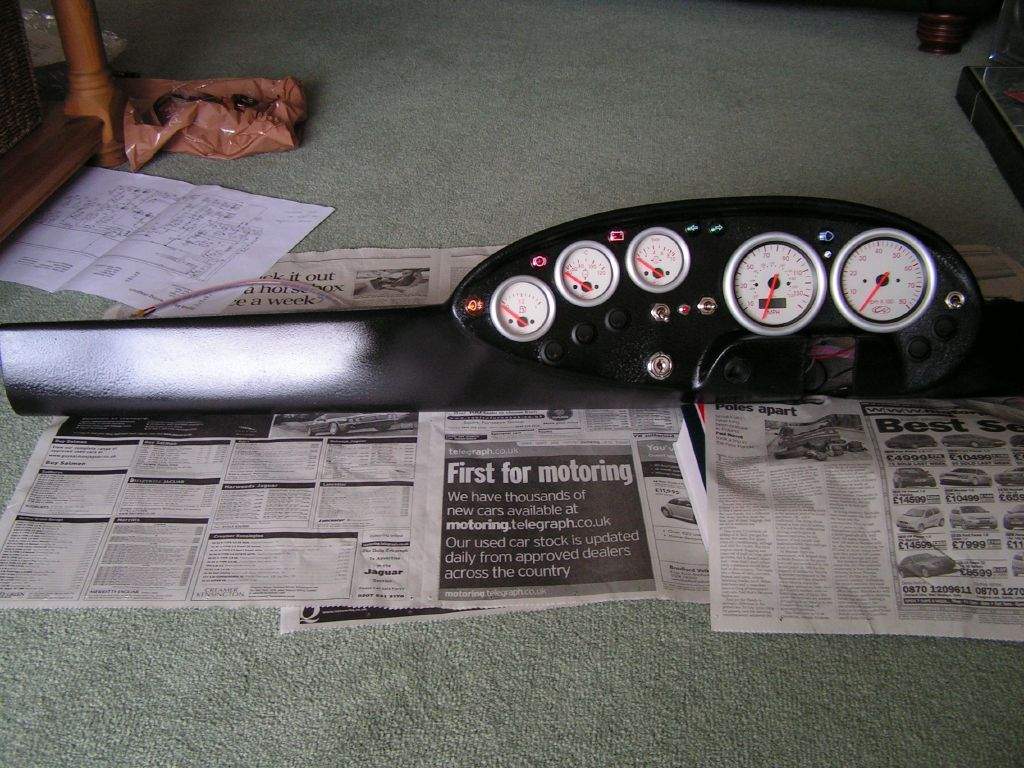
1st August: 6h00m: Blimey, it's August already! I'm hoping to get the car finished this month, so the next few weeks will be manic. Checked that the dashboard was dry, and then began re-assembly. This was a frustratingly time consuming process, but eventually, all the gauges, switches and warning lights were back in place.
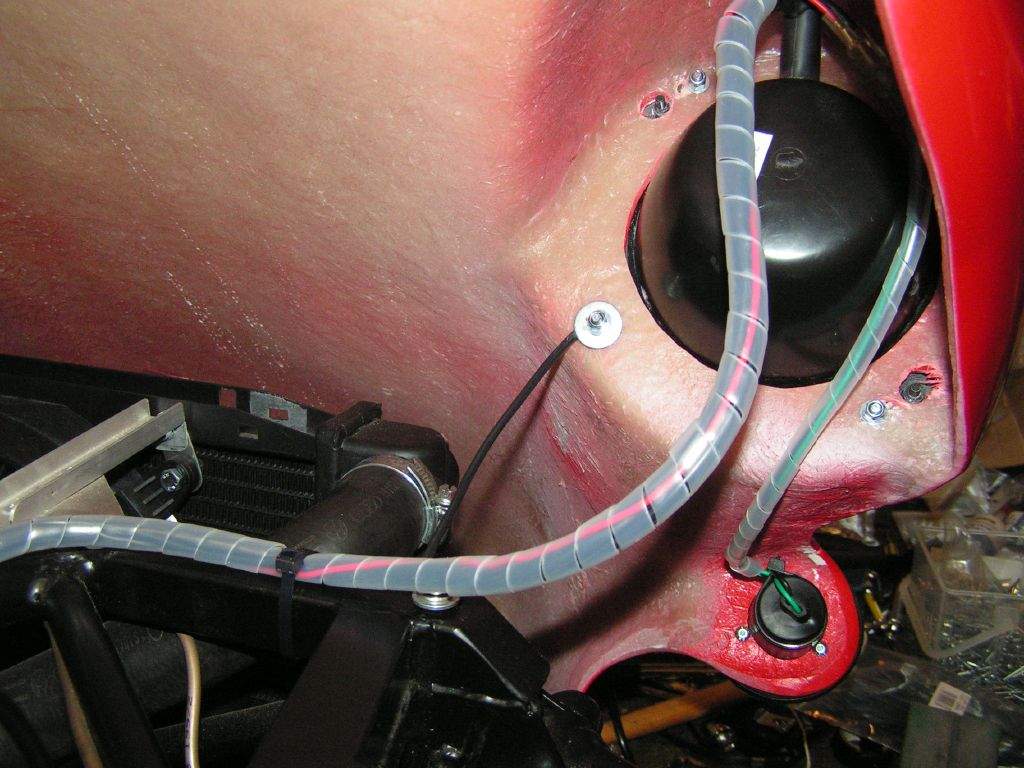
Made an attempt to set up the tracking more accurately. I did this in the garage so that the floor was roughly level, setting up a string line down each side of the car, parallel with the centre line of the chassis. I then used the string as a reference to measure to the front and rear edge of each wheel rim. To start with, I've simply set the car up with approximately zero toe at all four corners- in the long run, the front in particular will need fine tuning. As for camber, I just checked visually that things didn't look too wild, and will get this set properly post SVA. Fitted the wiper motor to the tub, having finalised how it is being wired up. I've had to abandon my original plan of using the intermittent function, so it will now be a simple 2 position switch, one being the 'parked' position, the other being a constant speed (since mine is a 2 speed motor, I can connect either the 'fast' or the 'slow'- I've gone for 'slow' for the time being, but a change is just a matter of scrabbling about under the dash to change over one connection). I moved on to paint the insides of all four wings with 'liquid rubber', bought from B&Q. This should help to resist star cracks appearing in the body as stones are thrown up onto the lower surface.
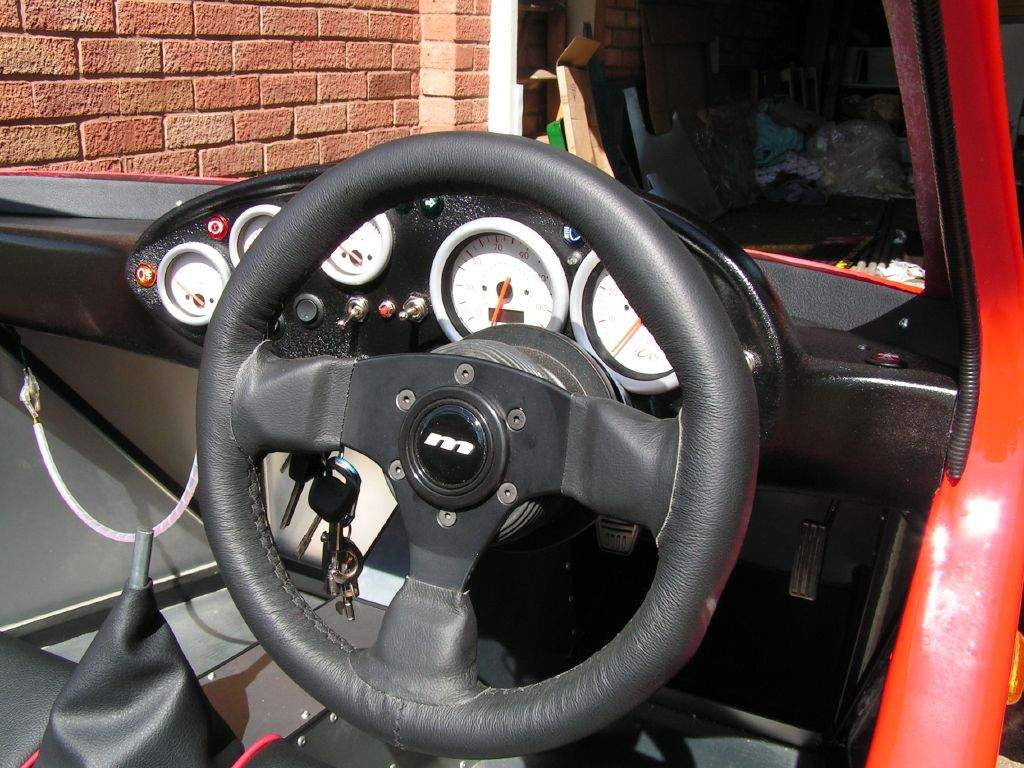
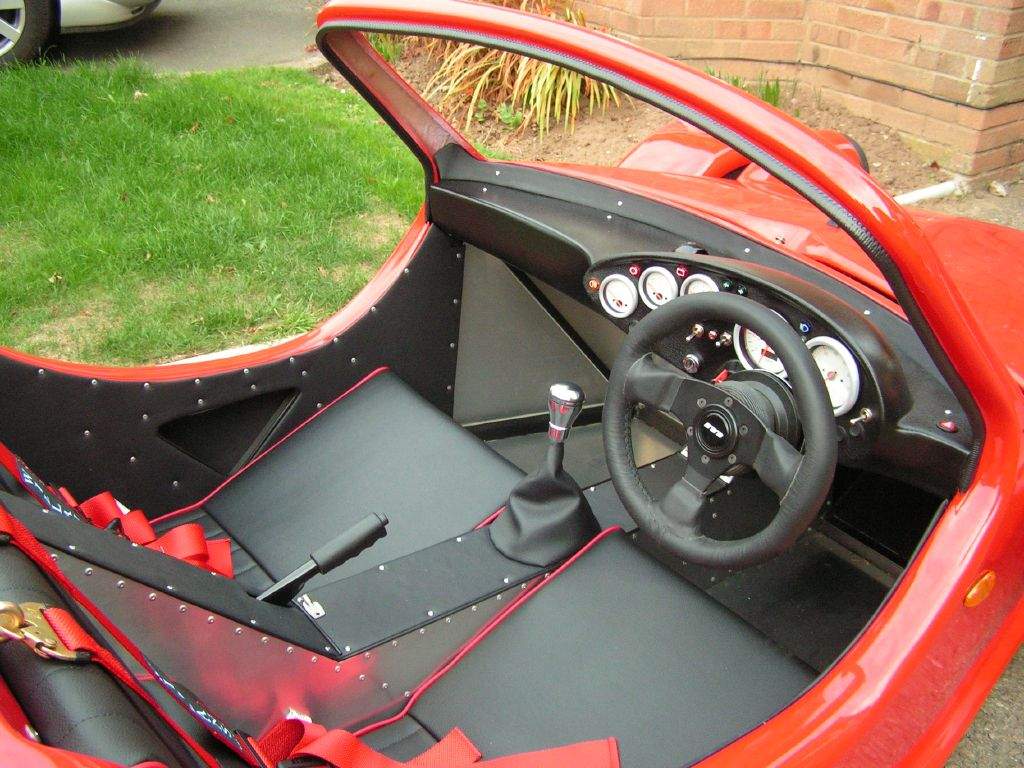
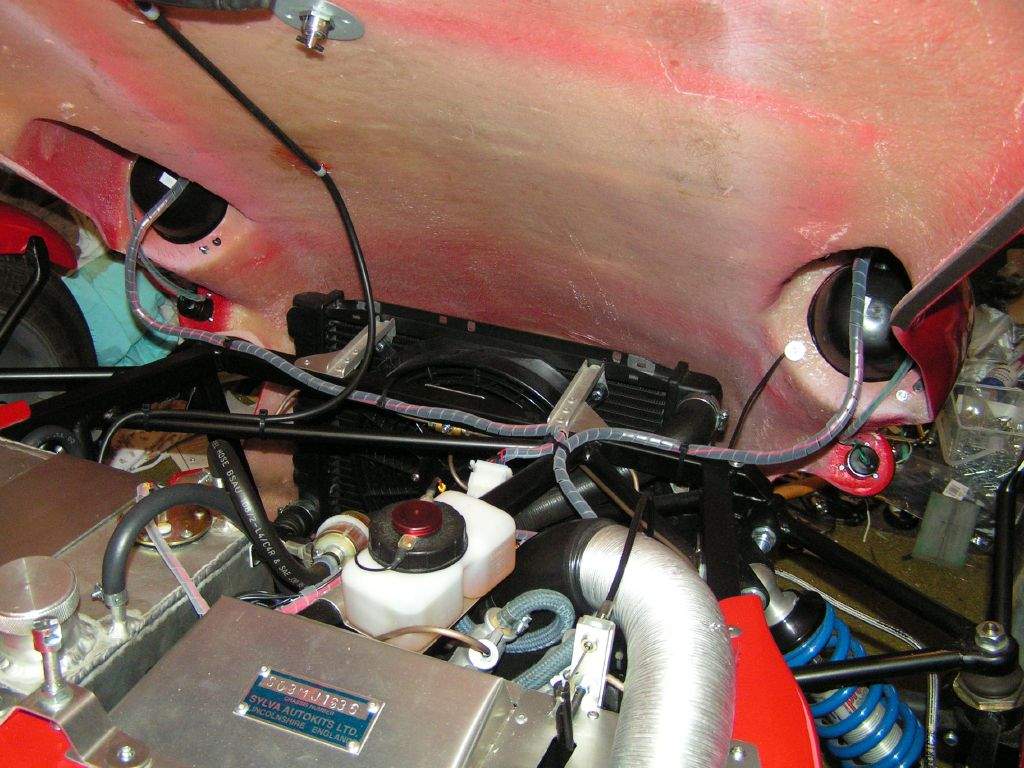
Last jobs of the day were to wire up the rear number plate lights and fog light. 2nd August: 3h30m: Applied some black sealant to the driver's side in-fill panel, to help keep out stuff thrown up by the rear wheels. Also sealed the join between the body and the floor panel by applying a thin bead along the outside. At this point the heavens opened so a quick retreat to the garage was made. Decided that the next job was to get the dashboard installed, so that I can get the engine running again to check everything seems OK before putting the rear wings on. Paranoid about scratching either the dash or the body, I depleted the world supplies of bubble wrap... I knew that this task was going to be a pain, and so it turned out! Because I have mounted the battery isolator switch on the dash, I have to run the main battery cables behind the dash, and getting these into position is a pain. I ended up with the dash more or less in the right position, but angled so that the dials were pointing skywards. I then managed to manoeuvre myself into the footwell with my head under the dash, legs hanging over the roll-over bar- mmmm, comfortable! I was still having to work in a very limited amount of space behind the dash, but managed to get things connected up. The trouble was, the dash was then reluctant to be moved into its final position, but with a bit of fiddling, it went into place. I just need to try and check that no cables are being squashed- I think getting the dash back out again, especially after the screen is fitted, could be very difficult! 3rd August: 3h00m: Phoned intatrim to chase the delivery of my seats- they should arrive tomorrow! Had a further look at the dashboard, and decided I needed to re-route one of the battery cables... So, the dash came out again! A couple of hours later I was happier with the result, so you can imagine how my heart sank when I connected the battery and one of my circuits was dead. I went inside and ate my tea whilst trying to stem the flow of steam from my ears! Returning to the garage, determined to get the dash finally fixed in place, I once again took up the 'footwell position' and tried to check the wiring without removing the dash again. Hey presto, a connector had mysteriously separated itself from the fuse box. Pushing it back on, it was clear that the connector in question had lost its grip on the blade of the fusebox, so a quick squeeze with the pliers and all was sorted. Phew! Everything now seemed to work OK, although I haven't yet connected most of the external lights (at the moment, side repeaters, a rear fog light and 2 rear number plate lights are the only ones). Before going any further, I wanted to check that the engine ran OK. I had not yet run the engine on the new fuel line I put in quite a while ago, plus the engine had been sat for a couple of months without turning over, so it seemed a sensible thing to check before I started bolting on more things. So, I turned the key to get the fuel pump running, doing so repeatedly until fuel had reached the carbs (those clear fuel filters are useful for checking this). Then, I went for it and turned it over. A couple of coughs and it roared into life and settled to a good idle! Excellent! I left it running for 10 minutes or so, and everything seemed OK. The bulkhead seemed to stay a little cooler with the heat reflective mat fitted, the stat opened, and the temp was heading towards 90 degrees when I switched back off. With those successes behind me, I fitted the heater vents and distribution box to the dash, followed by the trim piece I made a couple of weeks ago to fill the gap between the dash and the body. It is now starting to look pretty nice! (even if I do say so myself...)
4th August: 1h30m: Seats arrived between me leaving for work and Liz leaving for work, so I'm now going to send off the the SVA form! I've requested 20th August as a test date, so let's see what happens... Once I got home, I unpacked the seats and tried them in place- they look great. Pushed the car up onto my wooden ramps to allow me to run a bead of sealant along the join between the tub and floor panel on the passenger side, and also sealed around the infill panel. 5th August: 4h00m: Covered the tunnel top panels in foam and vinyl, and glued the gear lever gaiter that Mum had posted back to me onto the surround before bolting it to the tunnel panel. A quick measure of the ride height revealed a ground clearance of about 4" front and rear. This is a little on the low side, so I jacked the rear of the car off the ground and wound in the spring platforms, and then did the same at the front. At the moment I'm just making sure the springs on an axle are wound in by the same amount (counting exposed threads)- I'm not worrying about corner weights for the time being. I then went round the car and tightened the suspension mount bolts. You should do this with the weight of the car carried through the suspension to avoid pre-loading the suspension bushes. However, the rear lower outer wishbone bolts are just about impossible to reach with the wheel fitted, so I tightened these with the car on a jack. I guess in the long run I ought to try and get the weight of the car to be carried through the suspension with the wheel off, by supporting the outer end of the wishbone on a block, before re-tightening the bolt. Fitted the offside rear wing and front cycle wing, just before it went dark! Now inside the garage, I moved on to another one of those jobs I just hate- adjusting the handbrake. It was now needing 3 clicks to really hold the car, so I felt it ought to be adjusted a little. However, this is no easy task, simply due to the lack of room around the mechanism in the tunnel. The procedure I am using is as follows:
The problem is that you can't adjust the cables with the handbrake lever in situ, so you have the joy of putting it all back together to find out you've tightened things up too much or not enough! In my case, after refitting the lever for the third time and still finding out it was dragging, I was fed up so gave up and went to bed! 6th August: 3h30m: I had the day off work today, so it turned into a bit of a Mojo epic! First job was to fit the nearside rear wing, so up on the trolley jack and off came the wheel. With the wing fitted (which takes a surprising amount of time, it's about 13 nuts and bolts, and access is a bit limited...) I decided to do a few other jobs inside the wheel arch! So, I cut out a section of the aluminium grille mesh I had bought for the job, and fitted to the rear wing intake. I fitted this by inserting a rivnut into the 'infill panel', and then bolting through the mesh. Fitted the rear lights to the wing, and wired them into a multiplug connector to join into the main loom. I then ran a little bit of sealant along the join between the tub and the wing from the underside. This will fill a few very small gaps that have not been taken up by tightening the nuts and bolts, just due to small variations in the surface of the mouldings. It will stop road wetness & grime from seeping through, and just generally seemed a sensible thing to do for 5 minutes work. I then switched back to the driver's side, and did the mesh, lights and sealant on that side. Unwrapped the engine cover for the first time since it returned from the sprayers, and fitted the lock barrel and securing pins. I then fitted some adhesive-backed foam strip around the edges, to prevent the cover from rubbing on the main tub. Unwrapped the bonnet, and fitted the grill mesh to the opening for the radiator. I cut the mesh about an inch too big all around, and carefully bent the edges over the return edge of the moulding. I secured it in place with copious amounts of clear silicone sealant. I just had enough mesh left to fit to the engine cover air scoop. Afterwards I realised that I actually need some more to do the little openings at the rear of the car, but I don't want to buy another sheet of the stuff for the sake of those 2 little cut outs! I'll have to try and blag someone elses offcuts...
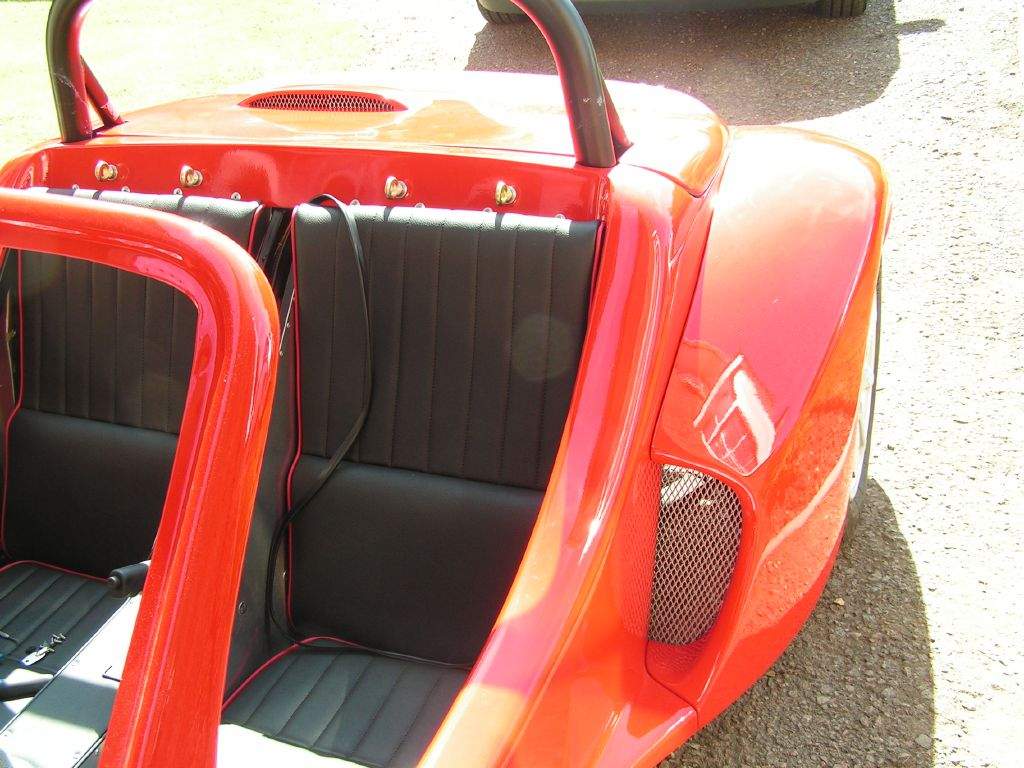
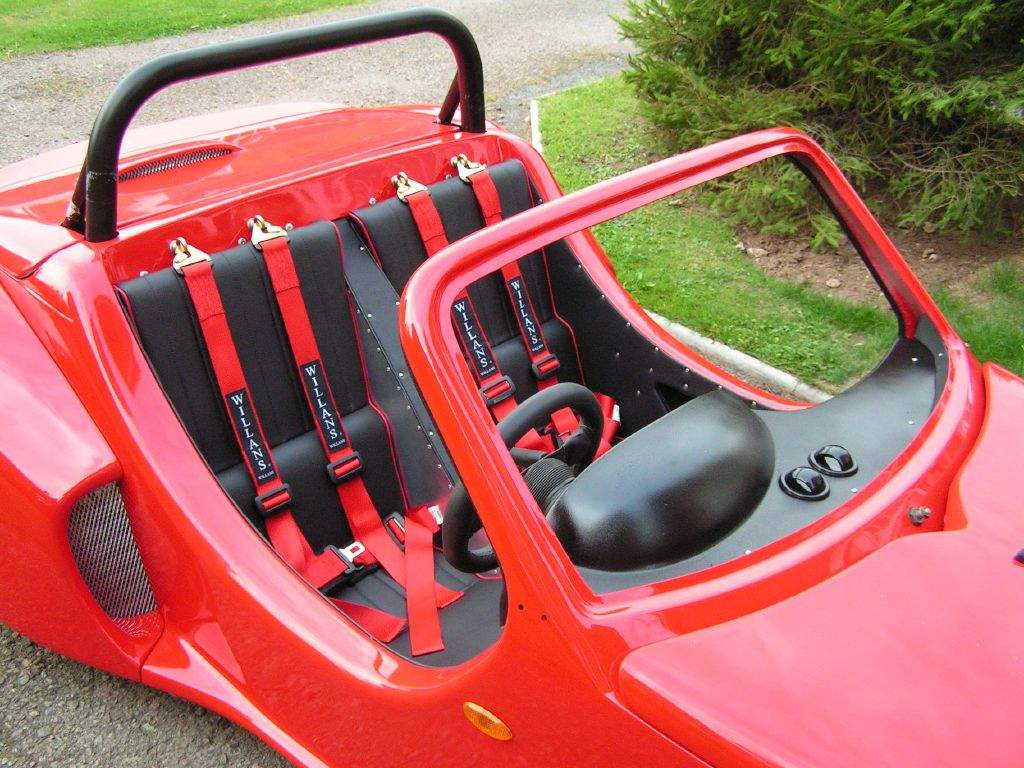
Added a small bit of vinyl trim to the inside of the map pocket, and at the same type fixed some beading around the edge of the opening. 7th August: 3h30m: Adjusted the handbrake one more time- this is becoming a pain! This time, the end result seems about right, so I moved on to fit the tunnel top panels into place. This was just a matter of fitting the wing piping along the edges of the panels to give a nice radiused edge- easy to describe, but it was fairly time consuming. Started rivetting the driver's side internal side panel into place. I had been nervous all along about rivetting into the main tub, with the back side of the rivet pulling against the fibreglass, but no problems with this panel. I couldn't resist putting the seat in and attaching the harness at this point! Moved on to the opposite panel, and with the first rivet- a mini disaster! I had deliberately started once again with the rivets into the tub just in case I had a problem, and in this case my worst fears were realised- a small crack appeared in the surface of the tub just as the rivet popped. Grrrrrrr. I drilled the rivet out, which allowed the crack to close back up, which was better, but I'm still a little frustrated! I decided to cover the crack (it's only very small) with a small dab of paint, as I had the remains of the tin that had been used when spraying the car. I then had a think about what to do to stop the same thing happening again. I was definitely not going to pop another rivet in the hole where the crack formed, I would fix an un-popped rivet with adhesive, but I wanted to rivet through the remaining holes. The problem seemed to be the amount of force needed to pop the rivet, so I had a trial with an offcut of fibreglass, where I deliberately weakened the mandrel of the rivet using tin snips before inserting into the rivet gun. This seemed to work, I needed to apply less pressure to pop the rivet, so I used this idea on the remaining rivets that passed into the tub. Whether I was just unlucky with the one rivet I don't know, but I had no further problems. It's just annoying that I had one problem rivet. My advice to Mojo builders is to either deliberately weaken the rivets as I did, or use some other method of fixing the panels to the tub. I think it is important that they are attached, as they give a lot of extra support to the tub when people are climbing in and out- but rivetting into fibreglass does seem to be asking for trouble to some extent... Thankfully the cracking I caused was fairly minimal, but others might not be so lucky! 8th August: 4h30m: Finished rivetting in the left hand outer trim panel to the chassis rails, and glued in the rivet that had caused all those problems yesterday. I just hope that the small crack in the gel coat and paint doesn't get any bigger... Fitted the passenger harness & seat- the interior is starting to look rather good now!
I had spent some time earlier in the week deciding how to do the windscreen wash. Jeremy Phillips generally straps the washer hose directly to the wiper arm, with a restriction in the end of the tube to slow down the flow of water. However, after a bit of fiddling with this idea, I decided that I wasn't happy with the amount of slack I would need in the tube to allow the wiper to, er, wipe. I'm trying to build the car with a very clean, uncluttered look, and a big loop of washer pipe didn't really conform! So, after conferring with Steve Knee, I have decided to use a normal washer jet mounted on the bonnet. I had wondered if this might be a very good way of giving the occupants of the car an instant shower, but Steve reports no such problems, so I've decided to give it a go. The scary part of this solution is the need to drill a hole in the bonnet, that is, the painted bonnet! After a trial in an offcut of fibreglass to decide on the drill size I needed to use, I put some masking tape on the bonnet, marked out the position and then drilled the hole, thankfully without any mishaps. Because the bonnet is hinged at the front, I then had to devise a way to secure the washer pipe to the underside of the bonnet. I found that one of the sizes of platic P-clips that I had in stock fitted the pipe perfectly, so I attached two to the bonnet with a small amount of fibreglass resin and mat. Decided it was now time to fit the lights to the bonnet. I'm using button head hex bolts and nyloc nuts, with the nut fitted to the inside of the light housing so that only the button head is visible from the inside of the fibreglass moulding. I then fitted the hinge brackets to the lower lip of the bonnet and offered it up to the front of the chassis, slotted the fixing bolts in, and hey presto, the bonnet is fitted! I then ran a length of the adhesive backed foam down both sides of the bonnet to stop it rubbing on the main tub. I still need to find a suitable seal to fill the gap at the base of the windscreen to the bonnet, to try and stop rain getting inside, or come up with some method of draining any water that does get under there away.
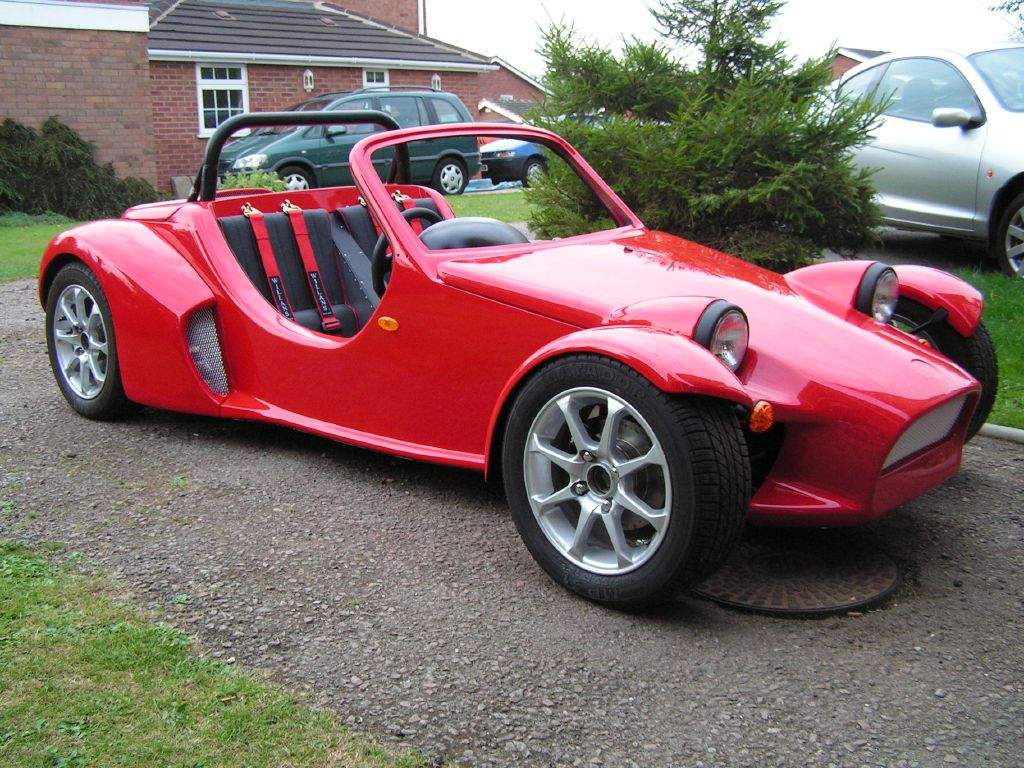
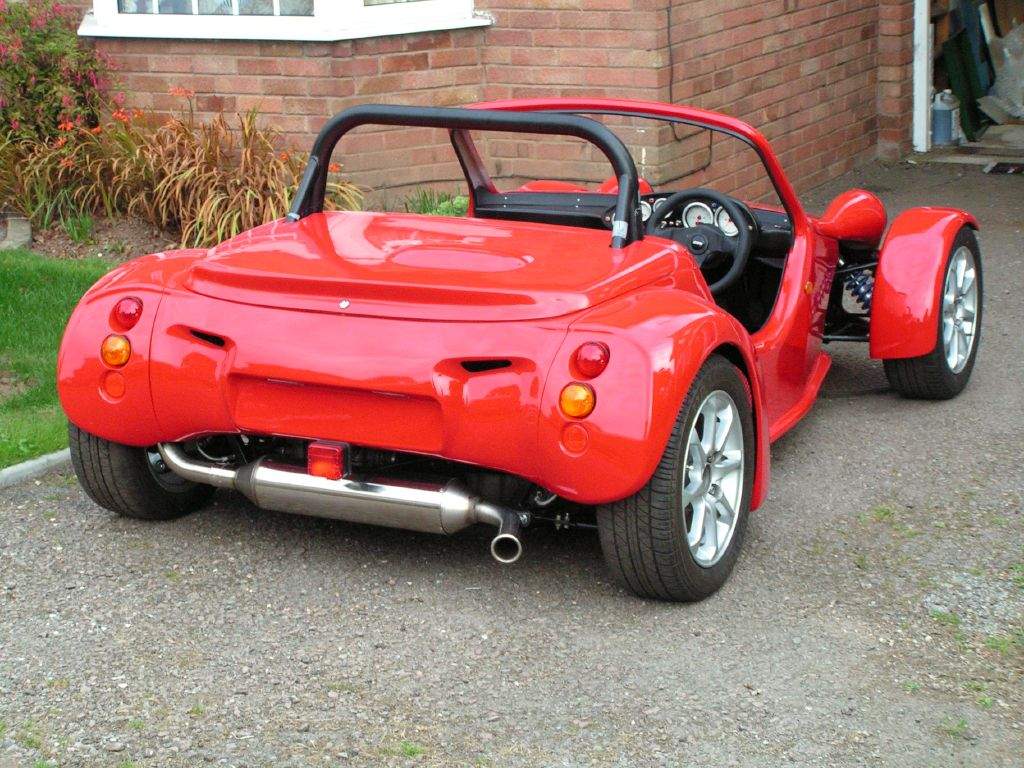
Finally, I fitted the SYLVA badge to the nose and the mojo logo to the rear of the tub! 9th August: 2h00m: Well, after the high temperatures of the last few days, today's rain is quite refreshing, although it restricts progress on the Mojo. Mind you, the list of jobs to do has now dwindled to such an extent that I am not too worried! First job tonight was to make some kind of strap to hold the bonnet open. The bonnet moulding has a natural 'balance' that holds itself open, with the front edge of the nose resting on the floor. This is fine, except the chances of the nose picking up scuffs over time is high. So, I wanted to fit a strap of some sorts that would stop the bonnet opening quite so far, but enough that it still holds itself open under its own weight. After a bit of digging around the garage, I decided that the best thing to use that I had lurking was a short length of the 2mm core earth cable that I'd used in some of the loom. I then fitted a large washer to the back of one of the headlight securing bolts and trapped the cable underneath it. I fitted a rivnut to the top corner of the front chassis rail, and trapped the other end of the cable under a bolt and washer threaded into it. This seems to do the trick, and looks a little better than a bit of string!
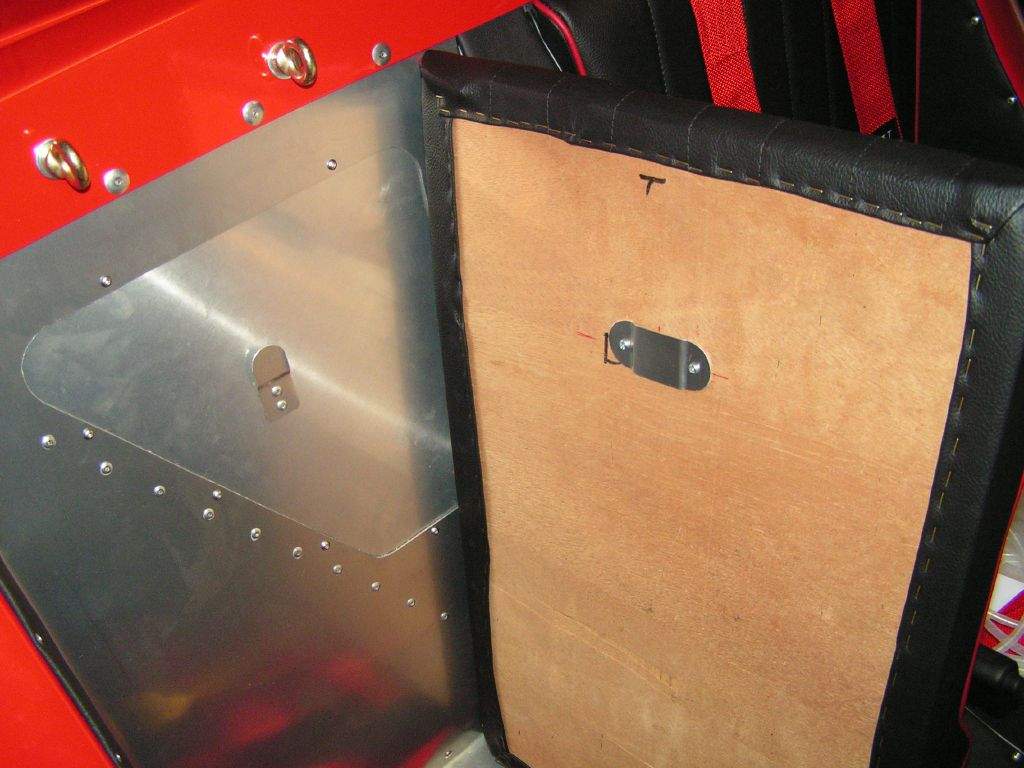
In the process of doing the above, I had driven the front of the car onto the wooden ramps to ease access under the bonnet. When I reversed the car off the ramps, I noticed rather a lot of smoke coming out of the exhaust... Oh no! Then I remembered that a few days ago I had sealed the exhaust joints with a 'fire gum' type exhaust sealant, and just at that moment the exhaust spat out a few chunks of the stuff. At this point the smokiness went away, and all of a sudden I relaxed a little! This was the first time I'd run the engine for more than about 10 seconds since sealing the exhaust joints, so that seemed to be the source of the smoke. Phew. Nevertheless, paranoia set in and I left the engine idling, blipping the throttle occasionally, until it came up to temp. I wanted to double check the radiator fan operation anyway, so I let it cut in and cycle a couple of times. All seemed OK, apart from a slightly squeaky rattle type noise, which I don't think is anything internal to the engine, but you know what it's like when you're listening carefully, any little noise gets picked up by your ears. I don't think it's anything to worry about, so I shut the engine off. Final job for the day was to start wiring in the bonnet mounted lights- i.e. headlights and indicators. The cables wired into the light units just need running to a multiplug connector in the loom. I finished the driver's side and tested the operation- it's great to finally see a headlight working! 10th August: 2h00m: Phoned a couple of places for a quote to fit the windscreen. The first place I spoke to (a local firm that supposedly deal with a lot of classis cars) were unsure about doing the job away from their workshop, and suggested I trailered it to them! Err, I don't think so... Steve Knee had used RAC Autowindscreens, so they were the second place to call, and very helpful they were too. So, they should turn up on Saturday morning to do the job, £60+VAT, which seems reasonable. Wired in the nearside headlamp and indicator, and then checked that everything worked OK. Thankfully, no problems, so I think that is all the wiring now complete, tested and 'up and running'. I just need to get some more spiral wrap from maplin (the third pack!) to neaten things under the bonnet. Connected up the windscreen washer hose. Just need to remember not to test it again before the screen is fitted, otherwise I'll get a mouthful of washer fluid! Fitted a length of aluminium angle to each side of the floor to secure the seat base. The SVA manual states that for spearate cushion type seats, the regulation is that the cushions must not be able to move longitudinally or laterally. Since the cushions are a tight fit between the tunnel and the outer panel, lateral location is not a problem! The aluminium angle I have fitted makes contact with the plywood base that the seat foam is attached to, securing the seat well, without actually securing it in place (you can still easily lift the cushion out vertically).
11th August: 2h00m: Went on a brief shopping trip, which was only partially successful due to Maplin not having anything I needed in stock... Did get a few bits and pieces from my local factors though, including a Gunson's Carbalancer, loads of zip ties (SVA insurance policy!) and a bulb to replace a blown number plate lamp. 12th August: 3h30m: Booked an MOT! This is scary, the prospect of driving the car for the first time is both exciting, and filling me with dread! But, it has to be done at some point or other, so let's just hope for the best. The test is next Tuesday, and I'm using a garage that I know will take a bit of care, so I'm travelling about 20 miles. I think this is probably a good thing, a chance for a bit of a 'shakedown' before SVA, so wish me luck! Also sorted out insurance, and can highly recommend MSM for being very friendly and competitively priced (They also do european breakdown cover for £35). My policy was just over £300 for 7500 miles. Handily, they will duplicate your no claims discount even if you are using it on another policy. With my newly acquired Carbalancer, I had another go at balancing the carbs (what else would I use it for?) I had previously had a go at doing this with a short length of hose, listening to the hiss from each carb trumpet at a time . Either my ears are duff or the carbs have adjusted themselves, as the balance was a mile out. Thankfully the barrels within each carb seemed pretty well balanced (after my exploits a couple of months ago balancing the throttle plates within each carb), but both barrels of the right hand carb were drawing much more air than the left hand ones. A quick tweak with a screwdriver on the balance link, and a quick adjustment of the idle adjustment screw, and the balance was much better on the Carbalancer scale, although the smoothness of the engine didn't seem to change much. During this process the car had another brief smoky period followed by the ejection of another lump of rock solid fire gum. Hope this stops soon... After consulting with Steve Knee about whether he had secured the seat backrests in any way (he had), I used a similar method to secure mine. I have attached an aluminium bracket to each seat back with very short self tapping screws, and attached a corresponding interlocking bracket to the rear bulkhead with rivets.
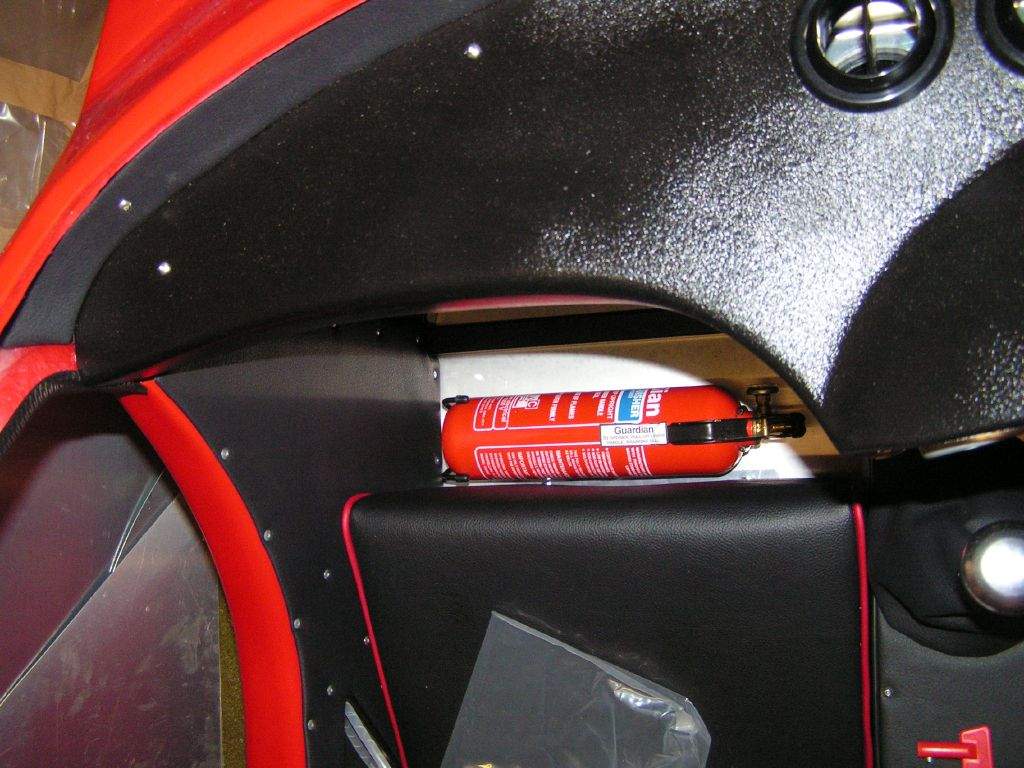
While checking the lighting circuits the other day, I'd noticed a strange thing with the headlights- when switching them on, occasionally they would come on, then flicker, then remain on. The flicker was accompanied by a click from the headlight relay, so something odd was going on... I removed the steering wheel so I could once again lay on my back in the footwell to check the fuse box and relay board that is mounted down there. Nothing was evident, so I wriggled back out, and tried to replicate the problem. Aha! The flicker happens as you release the rocker switch, so if I keep my finger on the switch, no flicker. Sounds like a dodgy switch? Thankfully, these little rocker switches can be prised out of the front of the dash and disconnected, so I pulled it out and took it apart, used a bit of brute force to adjust the little plate that makes the electrical connection and then put it all back together- and amazingly, this has fixed the problem. Phew, I had visions of the dash coming back out again... 13th August: 3h30m: Sad to hear that Andrew Cordery is planning to sell his recently completed CVH Mojo, but best wishes to Andrew, Helen and the baby that is on the way! Update: the car was sold within a couple of weeks. Stuff arrived from Maplin after having ordered on the internet yesterday- quite impressive service, and the postage was only just over £2, probably less than the petrol cost to get to my local store. Secured the fire extinguisher to the passenger side floor, just ahead of the seat base. I want to be carrying this on the way to the MOT on Tuesday, just in case...
Spiral wrapped the wiring to the bonnet mounted lights and secured with tie wraps, and then routed the windscreen washer pipe neatly and secured in place.
17th August: MOT day! I booked the test at a friendly garage about 20 miles away, to give me the chance to have a decent shakedown run. Everything went well on the journey there, and I had a follow car in the shape of Jon in his Caterham, a nice practical car to tow me with if a breakdown should happen :-) I failed the MOT, on the following three points:
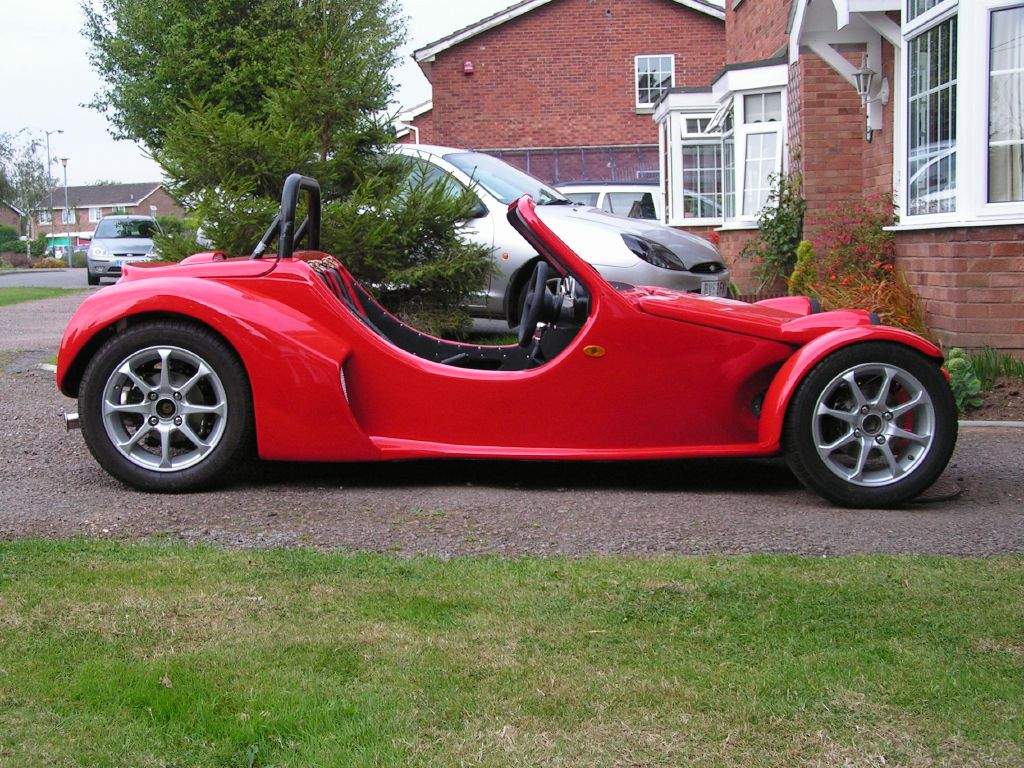
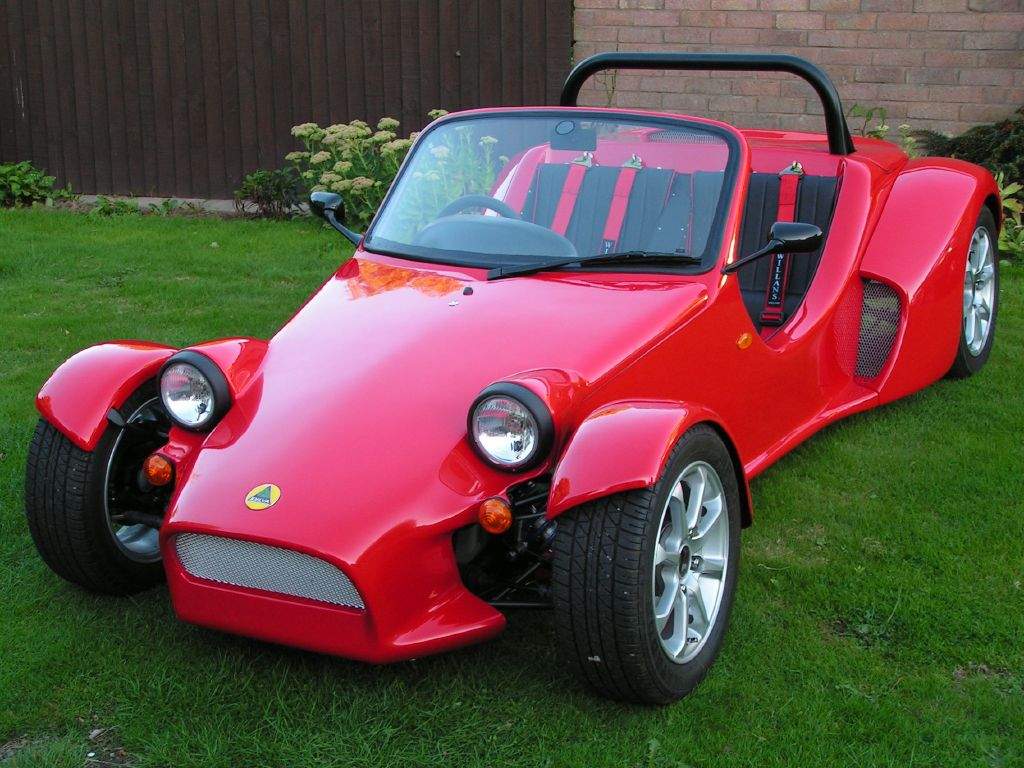
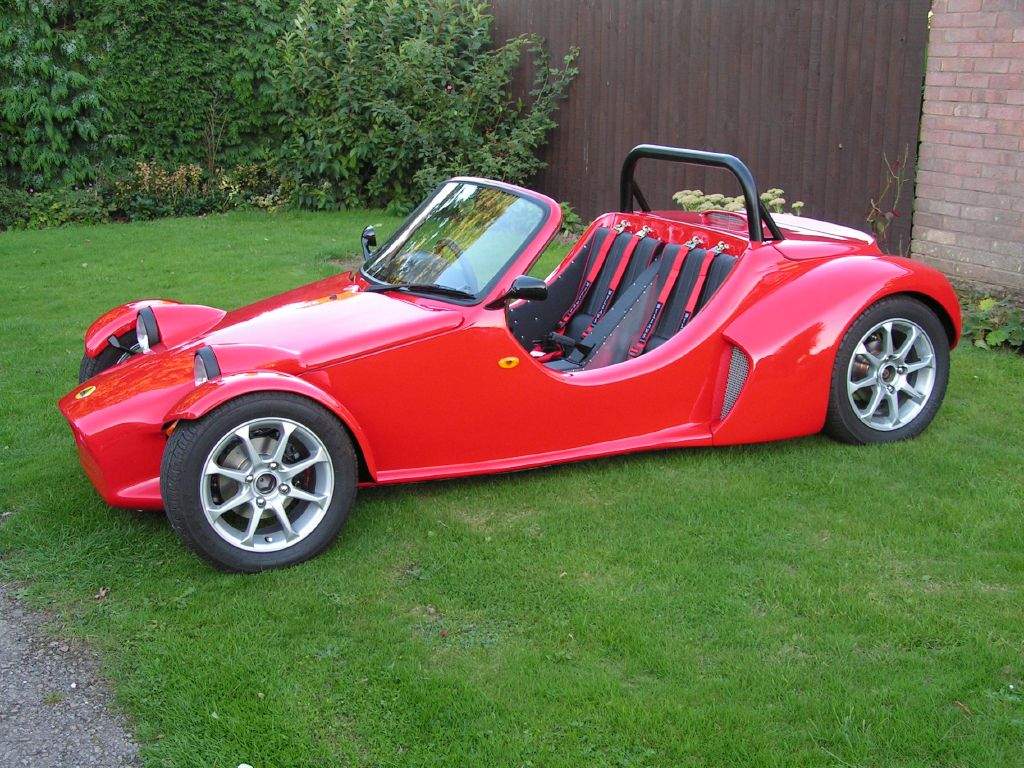
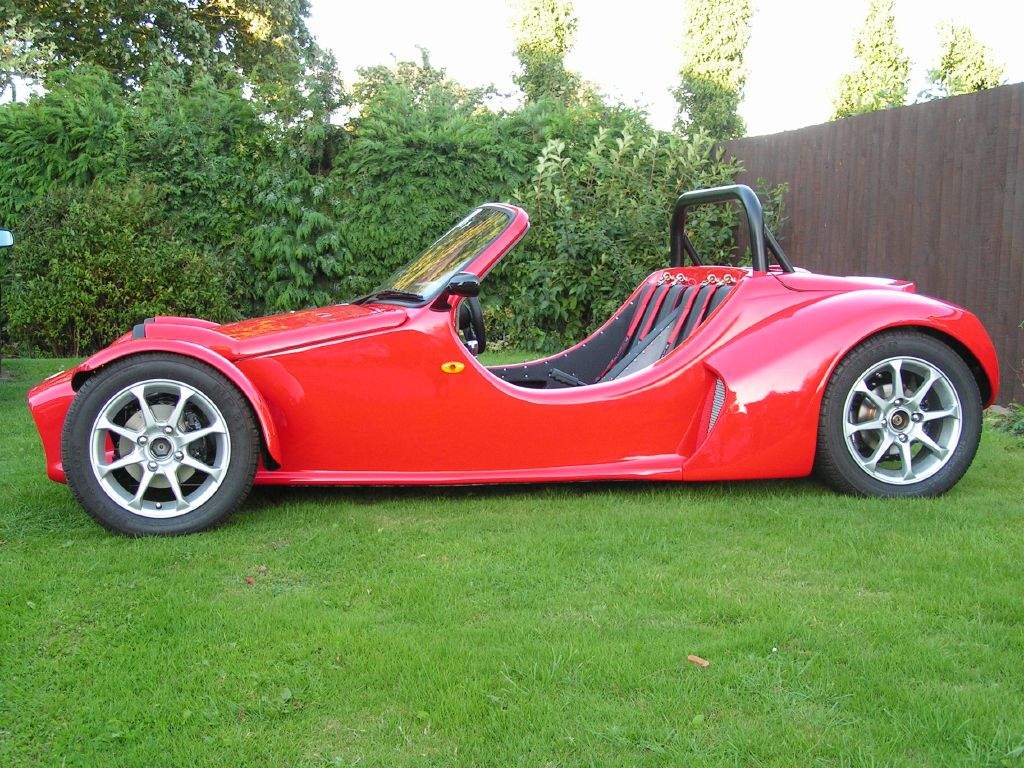
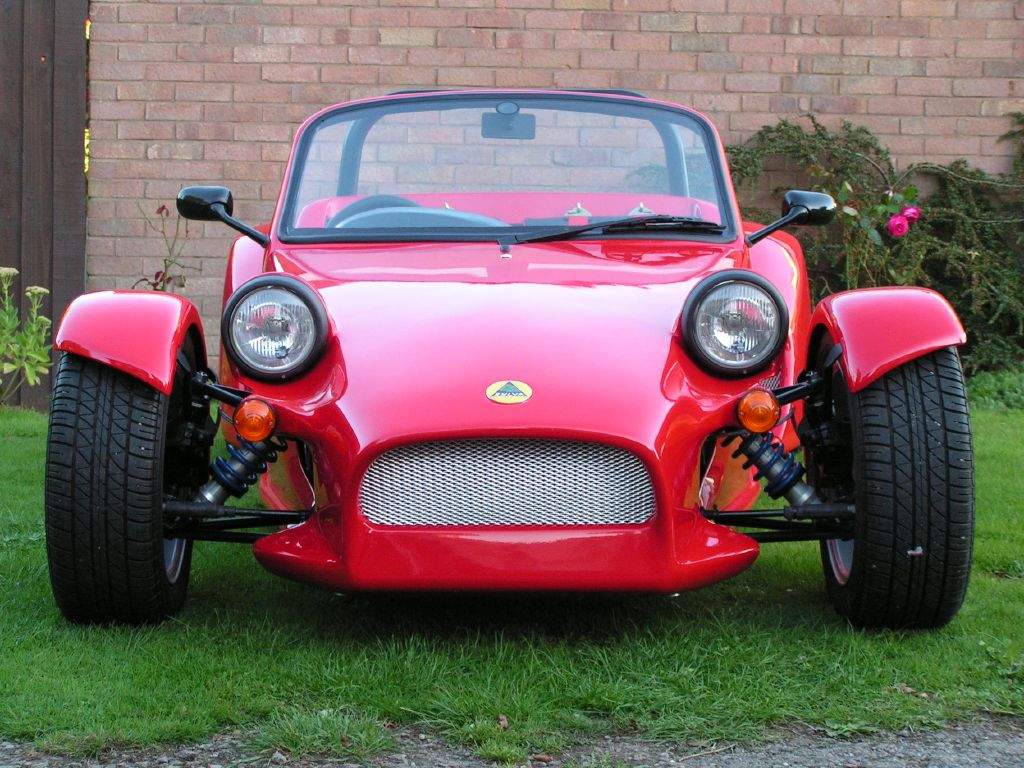
As the handbrake is not a quick and easy job, I accepted the fail and returned home, with no more mis-haps. 18th August: 1h45m: Phoned Birmingham SVA test centre to see if they had received my application. Yes, they had, I had been allocated a test on 6th September. Noooooo! Donington Kit Car Show is in my mind, and at that rate, SVA will be after the show! I asked if there was a chance of a cancellation, but the helpful chap suggested I phone my second choice test centre- Derby. Spoke to another nice enough chap at Derby, who went away to check the diary, and came back with 'Is next Tuesday OK?'- Now that's more like it! So long as the paperwork is transferred between Birmingham and Derby in the meantime, there should be no problems.... Yikes, SVA less than a week away! Back to work... I was a little surprised by the MOT failure of the handbrake. Apparently, it didn't seem to be pulling on the nearside brake. I jacked the back of the car up, and repeated the check I had done when adjusting last time- pull the lever one click at a time, and then see how easy it is to rotate each rear wheel by hand. They felt very similar! Well, I felt that I ought to do something, so I dismantled the mechanism, and wound a turn or so extra on the cable adjuster to the nearside brake. Let's hope that fixes it! 19th August: 1h15m: Put one turn of toe in on the offside front wheel, this should hopefully straighten up the steering a little and help with the self centring. Fitted a rubber sealing strip to the main tub, where the trailing edge of the bonnet sits. The gap here is bigger than elsewhere, so I couldn't use the adhesive-backed foam I have used previously. I decided it was important to fit a seal here, as otherwise water will run off the screen, under the bonnet, and potentially into the driver's footwell and the area ahead of that (remember that the floor panel runs right to the front of the chassis). The strip was fitted with double sided tape- time will tell if this is strong enough. Took another few piccies of the finished article:
Oh, finally added up the total number of hours spent building Mojo- 503hrs and 15 minutes! Blimey... 20th August: MOT retest day! Repeated the drive, this time without Caterham accompaniment as my confidence was slightly higher! I drove the car into the workshop and onto the brake test rollers. Tim got me to apply the handbrake while he checked the readings- pass on both sides! Phew... Next up, headlamps. These were still aiming too high, so I adjusted them down until legal. Finally, emissions. This was the one thing I was a bit nervous about, as getting it down from 9% to 3.5% seemed like a big drop. With the emissions probe up the exhaust, I twiddled the idle mixture screws, moving each an eighth of a turn at a time. Thankfully, the CO reading dropped quickly, so after winding each in by about half a turn, I was down to about 3.2%. I had to wind in the idle speed adjustment screw a little to keep the engine from dying, but it still ran smoothly enough. PASS!! Elated at getting through so easily, I didn't mind too much that it started raining on the way home. I was staying fairly dry until hitting a few patches of standing water, at which point the front tyres dumped a whole load of water into the car! All part of the fun I suppose. Anyway, the wiper worked, the rain eased off, and I made it home safely. The other things to note from the day are:
All in all a successful day! 21st August: I need to improve the self centring, so spent an hour or so fiddling with settings. I tried 2 turns of toe in each side, 2 turns of toe out each side, both with high (30psi) and low (5psi) pressures. I found that toe in with low pressure actually did the opposite of self centring- it wound on more lock! Toe out with high pressures was the only setting that improved matters- it started to centre from full lock by about a half turn or so, so not exactly strong self centring, but maybe enough to get through SVA. Please note, all self centring testing was carried out on a private road, and not the small cul-de-sac in which I live. Ahem... :-) 24th August: SVA DAY! Got out of bed at 5.30, and was on the road by 6.15. Weather was thankfully OK, so had a quite pleasant run up to Derby on A and B roads (the M1 was just not appealing!). Arrived at 7.45, and was told to wait in the SVA lane in front of the testing building. After about 25 minutes, during which I was chatting to HGV drivers about the Mojo, a friendly chap came up and introduced himself as my tester for the day. In fact, he was going to be supervising his boss, who was having a 'practice' at doing the SVA test. Before I go into any more detail, let me just say now that the two testers were absolutely brilliant, game for a laugh, interested in the car, and genuinely seemed to want me to pass on the day. They made the whole process far less stressful than I had imagined, and kept me posted on what they were doing as they went along. Anyway, onto the test... First up, speedo test, and unfortunately the Derby rollers rely on the car to drive them, rather than being driven by a motor. This means they don't work very well with a speedo pickup on one driveshaft only. Guess how mine works? Yep, you guessed right! I'm told I'll have to go over to a kind of SVA sub-station based at Donington Park, once the rest of the test is complete. The next section is a bit of a blur, but included interior and exterior projections, light positions, emissions and a nosey under the bonnet and engine cover to check wiring, brake lines etc. I had to add a couple of bits of edge trim to the cycle wing stays, which were just contactable by the test dome, and a short length of spiral wrap to the pipe which joins the brake reservoir to one of the master cylinders (it was just touching a hard component, so the spiral wrap removed the risk of chafing). Interestingly, the emissions were far lower than tested at Friday's MOT (CO was about 3.2%, today it was 2.5%, HC were 1150ppm, today were 650ppm!), which suggests either duff equipment or a pair of carbs that change their setup according to the day of the week... Then we came across a sticking point, one that would be a pain to rectify on the day- they didn't like the upper seatbelt mounts, which passed through the fibreglass body and into the chassis mounts. Apparently, the fact that they tightened up against the fibreglass was bad, they wanted the hole in the fibreglass opening up so the eyebolt tightened directly against the chassis, or against a steel spacer. After pondering for a moment, one tester suggested that, seeing as you can access the rear of the eyebolt from the engine compartment, a locknut added to the rear would be enough to satisfy them. So, on with the test, and maybe I'd have to find a local 7/16th UNF nut supplier later! The car was then lifted on a hoist with me still sat inside, I was asked to move the steering across the full range of lock, and they had a general poke around. Everything OK from an SVA point of view, but they kindly pointed out that my gearbox seemed to be leaking oil... I hopped down to have a look, but it's difficult to see where the oil is coming from. Hmm. At least it must be a very slow leak, as I've not noticed any deposits on the garage floor at home yet! Next, brake test. First, they measured the wheelbase, driver position and then measured the weight on each 'axle'. Then the brake force at the wheels at various brake pedal forces was measured, and the info recorded to be fed into a computer later on. This would check the front rear balance was safe. Finally, one of the testers took the car outside, checking for self centring on the way around the car park to the mirror test area. After my efforts at the weekend, he agreed that there was a bit of self centring off full lock, but not a lot. However, they mentioned 'tight ball joints and rack' and declared it to be OK. Phew. So, mirrors were checked and again found to be OK, and then the final test was for noise, and I (well, the Mojo actually...) came in at 98.5dB, easily under the limit. So the test was all but complete, just the number crunching to do on the brake data, and the speedo test to get done. So, I had a tantalising wait for a few minutes before finding out that it had failed with too much rear brake bias! Aaaaagh! Now, up until this point the testers hadn't noticed the balance bar, but as soon as I mentioned adjusting it, they started making 'ooooh' and 'aaaah' noises. Oh dear. Seems they don't like bias bars, and said it would need to be 'permanently' locked with locknuts and roll-pins. Hmmm. Annoyingly, if I'd set the balance further forward before the test, I would have got through without them noticing the balance bar, but such is life! After discussing various options, it looked as though a retest was the only way forward. I pointed out that I didn't want to lock the bar, then return for a retest only to find the front-rear bias to still be a fail. Their best suggestion was to come to the retest with a cordless drill and carry out the procedure at the SVA test station, but this seems to be asking for trouble to me... Anyway, I still needed to get the speedo checked, so next I sped off to Donington Park. Unsurprisingly, the Mojo got a lot of attention whilst parked up outside the test centre (it's right next to the track), which was nice. Thankfully the speedo passed, although it is over-reading by quite a bit. I had a quick think about the brake balance thing, and had a new idea- return to Derby, fiddle with the balance bar, get the brakes re-tested so that I can confirm the new position is OK, then return home to 'permanently' lock in place. I did this, thinking I might be pushing my luck, but thankfully they were very gracious and the 'boss' tester re-did the brake test, with the result being a pass on the front-rear balance. So, some progress! I confirmed that a retest could be done in the next couple of days, and then I set off home. Whilst re-doing the brake test, the heavens opened and we had a torrential downpour. It had eased off by the time I set off for home, but I still got rather wet, mainly from surface water picked up by the front wheels- I think fitting the sidescreens will help a lot with this. So, I arrived home safely, not sure whether to be happy at how little needed putting right, or frustrated that I was 'so close yet so far'! I then set-to on dismantling the brake bias assembly, as it will have to be drilled out of the car due to access problems. Before I did this, I remembered to count the number of exposed threads on each side of the balance bar so I can return it to the correct setting- now that would have been a stupid mistake! So, I just need to pay a visit to my local nut supplier tomorrow for the seatbelt eyebolt nuts and some nuts for the balance bar. Time for a beer, I think! 25th August: Bought some suitable nuts and a couple of roll-pins, secured the brake balance bar in position and added the extra locknuts to the upper seatbelt mounts. 26th August: SVA retest day. Well, with the test booked for 2.30, I set off in hopeful mood, pretty sure that I was going to be all road legal in time for Donington. Little did I know... About 15 minutes into my journey, I heard a sudden 'whoosh', and looking over my shoulder, saw that the engine cover had decided to part company with the car... I pulled over as soon as possible, but walking back it was obvious that the cover wasn't going to just slot back in position. In fact, it was completely trashed, and in numerous different pieces- a write off. I tried to find the locating pins and the lock that were attached to the engine cover, for re-use on a new moulding, but to no avail. So, next job was to phone Derby SVA test centre and explain the predicament. After a short delay, I was told to continue, and that I should be OK to go through the re-test. This put me in a better frame of mind- at least if I can get through SVA, I can spend some time on the repairs whilst I wait for the registration to be processed. Once moving again, I was aware of a new rattle, so stopped again. I found the source of the rattle, and the engine cover episode was explained- the fixing that the engine cover lock had located on had come loose, allowing it to rotate. Hence, although the lock barrel was in the 'locked' position, the part it located into had rotated, and therefore released its grip on the engine cover. The locks were supplied with just plain fixing nuts, not nylocs, so I must not have torqued it tightly enough, and it just worked itself free. One pesky nut, and probably a couple of hundred quids worth of damage- typical. Anyway, I continued on my way, before hearing (well, feeling actually) my phone ring again. I pulled over, to find that it was Derby SVA on the line. My heart sank. They informed me that with the engine exposed, they would inevitably fail the car on the external projections rules (even though this wasn't a failure point at the first test). Completely disheartened, I turned around and headed for home. Just to finish the day off properly, I was then stopped by a police motorcyclist on the A46! Well, in fact I pulled over before he even got close to me, as I knew who he was after! He seemed rather bemused by the car, with no plates or tax, and was sceptical of my explanation of what I understood the rules to be. I gave him the number of Derby SVA centre and after he had spoken to the chap there for a minute or two, he let me continue on my way, admitting that he had learnt something new! Once home, I had a brief spell of trying to think what I needed to do to get things moving- I spoke to Jeremy at Sylva, and organised a new engine cover pick-up at the kit car meeting at Silverstone on Sunday, I ordered a scoop from the same place as before, and then I had a serious think about how to secure the engine cover in a more fail-safe way. The trouble with my previous method was that the failure of the one lock led to 'take off', as the locating pins along the front edge rely on the engine cover not being allowed to move back. Loose the lock at the rear, and the bonnet will slide backwards off the pins, and 3-2-1 we have lift-off... At this point I suddenly felt completely drained, and had 2 hours kip on the sofa until Liz came home with a cheer-me-up packet of Cadbury's Buttons. What a star! Needless to say, I am still feeling frustrated, demoralised, and slightly bemused by this whole episode, but I'll soon get over it once I can start work on getting things fixed. They say a kit car is never finished. That is certainly my experience at the moment! 27th - 29th August: Firstly, in case you were wondering, I have deliberately stopped logging hours spent working on the car. It was 'finished' prior to the original SVA test, so when I get around to counting up the total number of hours, I don't want to include any post SVA mods and fixes. During these couple of days there was not much I could do, while I waited for new bonnet locks and bonnet pins from Merlin, the scoop, and a new engine cover from Sylva. 30th August: Headed off for Silverstone, arriving at about 9.30am. The plan had been to catch Jeremy on the gate. A couple of minutes after I arrived, Steve Knee arrived in his black Mojo, so we had a quick chat and arranged for him to phone if JP was already inside. This turned out to be the case, so I went up to the main entrance and tried to blag my way in! They agreed if I left them the £10 entrance fee, I could have it back when I came back out again! Thankyou! I found a collection of a few Mojos in one of the pit garages (along with Strikers, Furys etc), and had a chance to meet some familiar faces, and also some unfamiliar ones too. I retrieved the engine cover, and then decided it was time to retrieve my tenner! Once home, I immediately set-to cutting out the engine cover to clear the rear roll bar stays. With that done, I could then mark out the minimum cut out to clear the carbs, and then the cover could at least sit in the correct position. I have decided to go for a different fixing method this time, and will be using 2 'bonnet pins' to secure the forward edge. Although these are normally iffy for SVA, the ones delivered yesterday by Merlin look as though they will get through the test if I position them carefully and add a sleeve to the hoop to increase the radius- the proximity to the roll bar helps as the spherical tester will not be able to contact certain parts of the securing pin. So, I then decided how to mount the pin to the chassis- time for some more aluminium brackets! I used the thickest sheet I could find (the stuff I used for the fuel tank strap) which was an absolute pain when it came to bending- it is stiff, and also cannot be bent around a sharp 90 degree bend without cracking. I had to compromise the design a little due to the restricted access now the body was fixed in place- I would have done it slightly differently otherwise. I had to use rivnuts in the chassis, so the brackets could be bolted in place (not enough room for the rivet gun with the bracket in place!) 31st August: Fitted the new lock to the rear edge of the engine cover. 1st September: Yes, I know this is in the 'August' section, but I never intended to be still working on getting through SVA in September. So I'll add a couple of entries here! No sign of the scoop, so not much I could do. I added 2 more brackets to support the middle of the forward edge of the engine cover. These are fixed to the return edge of the main tub, and just help to align the engine cover with the rest of the body. 2nd September: The scoop is here! I phoned Derby SVA test centre in the hope they might be able to fit me in tomorrow- there is still a chance to make it to Donington! Unfortunately, Friday at 1pm is the earliest they can do. Hmmm. Opened up the hole in the engine cover to the right size, and then fed the scoop through from underneath as before, and fibreglassed in position. 3rd September: Blended in the top surface of the scoop with filler, and once dry used wet and dry paper to give a smooth finish. I'm ready for re-SVA (again...). 4th September: Time is a bit tight today after working for 3 hours in the morning. I would have arrived on time at Derby if I hadn't been stopped by the police- again! So, a 15 minute delay from that episode, followed by 15 minutes stuck in a massive queue behind a tractor, and I was 10 minutes late for the test! Not a good way to impress the tester. Thankfully, Steve Knee had arranged to meet me at the test centre in his Mojo, and he managed to get chatting with my tester and reassure him that I was still coming. Apparently though, if you're more than 20 minutes late the test is cancelled. Phew! After a brief comment about my unpainted engine cover, the retest items were checked, with the last thing being a re-run of the brake test. The tester then disappeared again, as at the original test, to feed the results into a number cruncher to work out if the front-rear balance was OK. After a seemingly endless wait, he reappeared, MAC in hand! Yippee! I can finally put the SVA episode to bed. Steve then drove me up to Sheffield DVLA in a vain attempt to get registered straight away, but no luck. Hopefully I'll get the paperwork through next week... Registration: Most of the next week was spent waiting in anticipation of the registration paperwork arriving in the post. I had been told it should be 2-3 days, which tallied with Steve Knee's experience using the Sheffield office. So, when I arrived home at lunch time on Friday and there was still no sign of anything, I called the DVLA at Swansea (the local office numbers are not available) and they arranged for Sheffield to contact me 'within a couple of hours'. I was sceptical, but lo and behold, the phone rang within the allotted time. It turns out that there is only one chap who deals with kit car registrations in the Sheffield office, and he has been on holiday all week. Would have been nice to know, but hey, what's another weeks delay after the luck I've been having recently?! This is also frustrating as I could have arranged to get the engine cover sprayed during the last week- I hadn't done this as I was 'itching' to drive the car as soon as the paperwork came through, so I hadn't expected to have time. Anyway, I decided I might as well now get this sorted, so arranged to drop off the engine cover at Bill's, and at the same time take over my lower steering column link to Sylva- I am getting the lower rubber joint replaced with a proper UJ, which is how the latest Mojo kits are done. I'll go back to pick up the bits on Wednesday afternoon... Well, on Monday at 11am I had a call from Sheffield DVLA, from the chap who had been on holiday. He confirmed a couple of details with me, and then said it should be dealt with within 48 hours, no inspection required! Great! On return home from work on Tuesday, the paperwork had arrived! Yippee! So I sorted some number plates at Halfords, and fixed them in place (athough even this required the use of a dremel and hacksaw- you'll see why when I get some more pictures loaded up). Unfortunately the lack of lower steering column was a bit of a stopper when it came to going for a drive... Never mind, but tomorrow can't come soon enough! Wednesday afternoon I made the 5 hour round trip to get the engine cover and steering link. I had a good nosey at the so-nearly-finished R1ot in the Sylva workshop- it is going to be a fantastic little car. So, on return home, the engine cover and steering link were quickly fitted, and Liz and I went out for our first trip in the Mojo together. We're on the road! Here endeth the build diary... Total time spent during August: 45h30m TOTAL TIME SPENT ON THE BUILD: 503h15m!
|
||||||||||||||||||||||||||||||||||||||||||||
|
|
||||||||||||||||||||||||||||||||||||||||||||||